Your child’s favorite wooden train or dollhouse deserves gentle, effective care—without harsh chemicals. Many store-bought sprays contain ingredients that affect air quality, making them risky for kids and pets. But a simple DIY mix can keep toys clean and conditioned naturally.
As a parent and wood care enthusiast, I’ve relied on a 9-year-tested recipe with vinegar, lemon, and olive oil. It cleans while nourishing the material, saving time and worry. Let’s explore how to protect what matters most.
Key Takeaways
- Commercial cleaners may harm air quality in your home.
- Natural ingredients like vinegar and olive oil work well.
- DIY blends clean and condition in one step.
- Gentle care extends the life of wooden toys.
- Proven recipes offer peace of mind for families.
Why Safe Cleaning Matters for Wooden Toys
Wood absorbs everything, even hidden dangers in common disinfectants. That “fresh lemon” scent in sprays? It often masks phthalates—chemicals linked to health risks. For kids who chew or handle toys daily, these toxins pose real threats.
The Risks of Harsh Chemicals on Wood and Kids
Porous surfaces soak up liquids, trapping synthetic fragrances and preservatives. Over time, these chemicals degrade delicate finishes and release fumes into your home. CDC studies show children absorb toxins faster than adults, making gentle alternatives vital.
Take heirloom toys: unlike plastic, they survive generations because they avoid modern cleaners. Restoring them often reveals how natural care preserves wood’s integrity.
How Natural Cleaners Protect Your Toys (And Family)
Vinegar’s mild acidity lifts grime while disinfecting—no residue left behind. Essential oils like tea tree add antimicrobial power without synthetic additives. Together, they create a healthier environment for your family.
Think of it this way: if Grandma’s blocks lasted 50 years with soap and water, imagine what a mindful mix could do today.
Essential Supplies for Cleaning Wooden Toys Safely
Simple household items can transform how you maintain timeless toys. With the right tools, you’ll remove grime without damaging surfaces or exposing kids to toxins. Let’s explore what works best.
Soft Cloths and Brushes: Your Gentle Cleaning Tools
A microfiber cloth traps 99.5% of dirt, according to MW Pro studies. Unlike paper towels, it won’t scratch finishes. Keep a labeled set just for toys to avoid cross-contamination.
For crevices, use a soft-bristle toothbrush. Always test new cloths on hidden spots first to check for color bleeding.
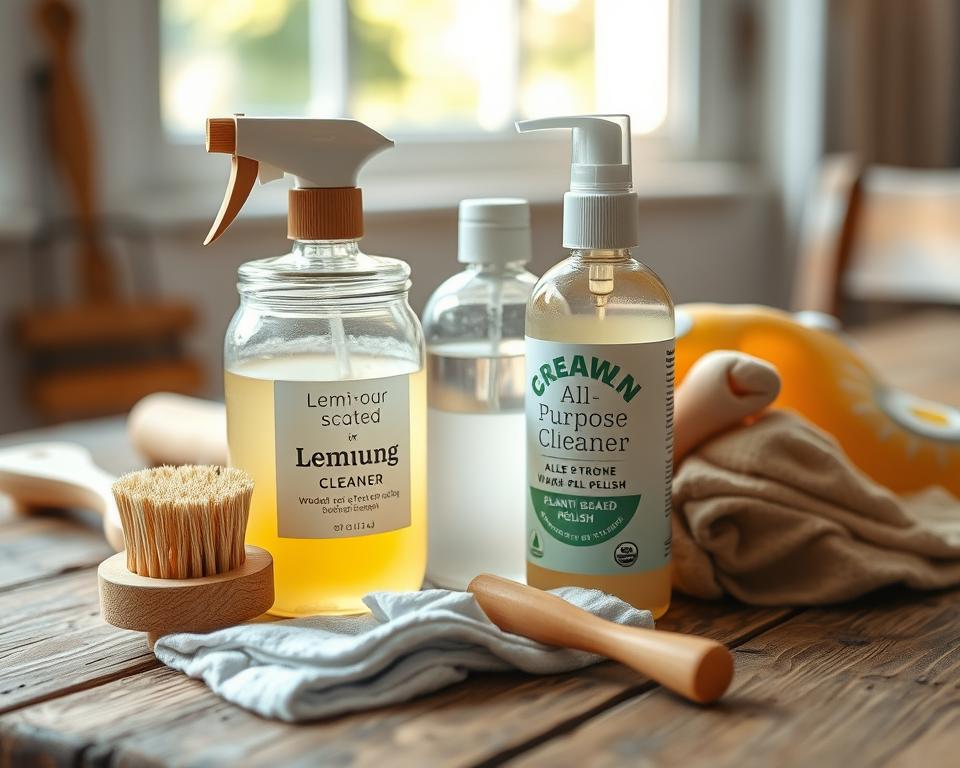
Must-Have Natural Ingredients From Your Pantry
Raid your kitchen for these effective staples:
- Vinegar: Mix with water (1:1) for a disinfecting spray.
- Lemon juice: Combines with olive oil to polish and sanitize.
- Olive oil: Conditions wood to prevent cracks.
- Castile soap: Plant-based and gentle for sticky messes.
DIY blends cost about $0.25 per batch—compared to $8 for store sprays. That’s 32x savings!
Step-by-Step Guide to Cleaning Wooden Toys
Dust and grime won’t stand a chance with these easy cleaning steps. Whether your child’s blocks look dull or their puzzle has sticky spots, a two-phase approach restores them safely. Start dry, then tackle tougher messes—no harsh chemicals needed.

Dry Cleaning: Removing Dust and Loose Dirt
Begin with a soft microfiber cloth to wipe the surface. This lifts dust without scratching finishes. For intricate carvings or puzzle crevices, use a soft-bristle toothbrush—it’s a parent-approved hack!
Howard’s Clean-A-Finish works well for heavy buildup, but a dry brush often does the trick. Remember: 30 seconds of drying time now prevents warping later.
Damp Cleaning: Tackling Sticky Spots and Grime
Mix a DIY solution of equal parts water and vinegar. Dampen a cloth (never soak it) and wipe sticky areas. For gentle sanitizing, try the 3-tea bag method—steep in warm water, then use the cooled liquid.
Turn it into a game: kids love helping with “magic” sprays. Just avoid submerging toys—water can seep into seams and cause damage.
DIY Safe Cleaning Solutions for Wood
Transform everyday pantry staples into powerful, toxin-free cleaners for cherished playthings. These recipes blend science and simplicity—no PhD required.
Vinegar and Water: The Classic Wood Cleaner
Vinegar’s acidity dissolves sticky residues naturally. Mix equal parts water and vinegar for a streak-free spray. Pro tip: Test on hidden spots first—some finishes may react.
This solution tackles germs without harsh fumes. Kids can even help spray (supervised, of course). Just avoid over-wetting to prevent warping.
Lemon Juice and Olive Oil: For Shine and Sanitizing
Combine ¼ cup oil with 2 tablespoons lemon juice. The citrus cuts grease while the oil conditions. That fresh scent? It means it’s working.
Store mixes in the fridge—they last 2 weeks. Allergy alert: Swap olive oil for sunflower oil if needed.
Castile Soap Solution: Gentle Yet Effective
Dilute 1 tablespoon soap in 1 cup water. This plant-based soap lifts dirt without stripping finishes. Perfect for painted toys or delicate carvings.
Pair with a microfiber cloth for spotless results. Remember: Less is more—over-soaping can leave residue.
How to Deep Clean Heavily Soiled Wooden Toys
Stubborn stains on wooden toys? Don’t panic—nature has solutions. Heavy use can leave behind crayon marks, food smudges, or even mold. With the right approach, even the grimiest toys can shine again.
Spot-Testing Your Cleaner First
Always test cleaners on hidden areas. Dab a small amount of your mix (like vinegar or baking soda paste) on the toy’s underside. Wait 10 minutes to check for discoloration or damage to the finishes.
Howard’s Restore-A-Finish works wonders for scratches. For odors, activated charcoal absorbs smells naturally—just place it near the toy overnight.
Removing Stubborn Stains Naturally
Identify the stain source first. Crayon marks? Mix baking soda and water into a paste, gently scrub, then wipe clean. For mold, sunlight is your ally—2–4 hours of direct exposure kills spores.
Create a “toy hospital” for badly soiled items. Quarantine them until fully cleaned to avoid spreading grime. One parent saved moldy sandbox toys this way!
With a little care and time, even deep-set stains fade away. Your child’s favorites will look like new—without harsh chemicals.
Drying and Maintaining Your Wooden Toys
Moisture is wood’s biggest enemy—here’s how to protect playthings. Even the gentlest cleaner can cause damage if toys aren’t dried properly. Follow these steps to keep them sturdy and splinter-free for generations.

Proper Drying Techniques to Prevent Damage
Airflow is key. Place toys near a fan or open window for cross-ventilation. Porous blocks need 24 hours to dry fully—flip them halfway to avoid warping.
Never use heat! Hairdryers or sunlight bake moisture into the surface, causing cracks. Pat dry with microfiber cloths first to speed up the process.
When and How to Apply Protective Oils
For oil-finished toys, use olive oil like moisturizer on baby skin. Warm 1 teaspoon in your hands, then massage into the grain every 3–6 months.
Pro tip: Buff with a clean cloth after 10 minutes to prevent dust buildup. Over-oiling creates sticky spots that attract grime.
- Seasonal care: Oil before summer humidity and winter dryness.
- Storage rotation: Swap out toys monthly to evenly distribute wear.
- Warning: Wax-based finishes don’t need oil—check labels first.
Natural Disinfecting Methods for Wooden Toys
Nature offers powerful ways to keep wooden toys germ-free without harsh chemicals. From sunlight’s UV rays to plant-based essential oils, these methods protect kids and preserve toys. Best of all, they’re backed by science—not marketing hype.
Sunlight: Nature’s Disinfectant
The CDC confirms UV light kills 99% of germs. Place toys in direct sunlight for 2–4 hours, ideally between 10 AM and 2 PM when UV rays peak. Rotate items to expose all sides.
For painted toys, limit sun exposure to prevent fading. Think of it as a “sun bath”—refreshing but not endless.
Essential Oils With Antimicrobial Properties
Tea tree, lavender, and lemon oils fight bacteria naturally. Dilute 10 drops in 1 cup water for a spray. Avoid oils like eucalyptus around pets—they can be toxic.
- UV index guide: Aim for 3+ (check weather apps).
- Dilution chart: 1% for kids’ toys (12 drops per cup).
- Playroom diffuser blend: 3 drops tea tree + 2 drops orange.
Schools love these methods—they meet safety standards without synthetic disinfectants. A win for health and simplicity.
What NOT to Use on Wooden Toys
Not all cleaning methods are created equal—some can ruin wooden toys faster than playtime wear. From outdated products to well-meaning mistakes, certain approaches cause irreversible damage. Let’s uncover the hidden hazards lurking in your cabinet.
Harsh Chemicals to Steer Clear Of
Murphy’s Oil Soap, once a go-to, now risks dulling modern finishes. Its formula changed in 2016, leaving a sticky residue. Bleach is worse—it breaks down wood fibers and releases toxic fumes.
Avoid these common offenders:
- Ammonia: Dries out wood, causing cracks.
- Furniture polish (like Pledge): Clogs pores, attracting dust.
- Windex: Alcohol content strips protective oils.
Water’s Hidden Dangers
Tap water contains minerals that leave white spots. Distilled water reduces this risk, but even then, excess moisture swells wood grain. Under a microscope, soaked fibers look like split logs—a recipe for warping.
Emergency tip: If bleach touches a toy, rinse with cold water immediately. Then air-dry upside down to prevent pooling.
Storing Wooden Toys to Keep Them Clean Longer
Proper storage doubles the lifespan of cherished wooden toys while keeping them pristine. Humidity, light, and airflow all play roles in preventing wear. Aim for 55% humidity—the sweet spot to avoid warping or cracking.
Ideal Storage Conditions for Durability
Cedar chests naturally repel pests and absorb excess moisture. For open shelves, keep toys away from radiators or sunny windows. Temperature swings damage finishes faster than playtime roughhousing.
Preventing Mold and Mildew Naturally
Silica gel packs (or DIY rice sachets) control dampness in closed spaces. Rotate toys seasonally to ensure even air exposure. Label bins by size or type for quick access—less handling means less dirt.
- Climate hacks: Use a hygrometer to monitor your home’s humidity.
- Cat litter trick: Fill breathable bags with clay litter as a dehumidifier.
- Rotation system: Store half the toys monthly to reduce clutter and wear.
With thoughtful care, your child’s favorites will stay cleaner—and ready for the next generation.
Troubleshooting Common Wooden Toy Cleaning Challenges
Even well-loved wooden toys can develop common issues over time. From cloudy finishes to minor scratches, these problems often look worse than they are. With the right approach, you can bring back their original charm.
Dealing With Water Marks or Cloudiness
White rings from cups or humidity respond well to a baking soda paste. Mix 1 tablespoon with water to form a thick consistency. Gently rub with a soft cloth, then wipe clean.
For stubborn cloudiness, try the mayonnaise trick. Apply a thin layer, let sit for 15 minutes, then buff. The oils penetrate the surface while the vinegar lifts residue.
Restoring Faded or Dried-Out Wood
Walnut meat works wonders for minor scratches. Rub the raw nut directly on marks—its natural oils darken the wood. Buff after 5 minutes for a seamless fix.
Revive faded toys with food-grade beeswax. Melt a small amount between your hands, then massage into the grain. This protects while enhancing color naturally.
Pro tips:
- Use 400+ grit sandpaper for smoothing—anything coarser risks damage
- Photograph before/after for insurance records on antique pieces
- Consult a restorer for structural cracks or loose joints
Conclusion: Keeping Wooden Toys Safe and Beautiful for Years
A 100-year-old treadle sewing machine still works today—proof that mindful care creates lasting treasures. With your home’s natural cleaners and these tips, toys will stay safe for generations. Imagine handing down that dollhouse, its wood glowing like new.
Commit to simple habits: oil finishes yearly, rotate toys seasonally, and share methods with other parents. Studies show wooden toys last 10x longer than plastic when maintained well. That’s fewer landfill trips and more beautiful memories.
Join local toy swaps or host a care workshop. Every polished block tells a story. You’ve got this—and our biodegradable wooden toys guide is here to help!
FAQ
Why should I avoid harsh chemicals on wooden toys?
Strong cleaners can strip natural finishes and may leave harmful residues that little ones could ingest. Gentle, natural options keep both the wood and your family protected.
What household ingredients work best for cleaning wooden toys?
White vinegar, lemon juice, and mild Castile soap mixed with water make effective, non-toxic solutions. Olive oil can add shine and moisture to dried-out pieces.
How do I remove sticky residue from wooden toys?
Dampen a microfiber cloth with a vinegar-water mix (1:1 ratio) and gently rub the spot. For tougher grime, use a soft-bristled brush with mild soapy water.
Can I use essential oils to disinfect wooden toys?
Yes! Tea tree, lavender, or lemon essential oils (diluted in water) have natural antimicrobial properties. Always spot-test first and use sparingly.
How should I dry wooden toys after cleaning?
Wipe with a dry cloth immediately and air-dry completely away from direct heat. Never soak wood – excess moisture causes warping or cracking.
What’s the best way to store wooden toys between uses?
Keep them in breathable containers or open bins in a dry area. Avoid plastic bags that trap moisture and could lead to mold growth.
How often should I oil wooden toys?
Apply food-grade mineral oil or beeswax every 2-3 months, or when surfaces look dry. This maintains the wood’s natural luster and prevents splitting.
Can sunlight clean wooden toys?
Brief sun exposure (30-60 minutes) helps kill bacteria naturally. But prolonged UV rays may fade colors, so limit sessions and rotate pieces.
What should I do if water leaves white marks on wood?
Rub the spot gently with a cloth dipped in equal parts vinegar and olive oil. For deeper stains, very fine sandpaper (220+ grit) can help.
Are commercial wood polishes safe for children’s toys?
Most contain chemicals unsafe for mouthing. Stick to edible-grade oils like coconut or walnut oil for toys young kids may chew on.